Exchange Server administrators, sometimes, need to export mailboxes from Exchange Server to PST files. Some common reasons include archiving old/unwanted mailboxes, taking backup of mailbox of an employee leaving the organization, and others. To export mailboxes to PST, Exchange Server (2010 SP1 onwards) provides the New-MailboxExportRequest PowerShell command. This cmdlet is used with various parameters and switches to export some specific emails from the mailbox to PST. In this article, we will see how to use the New-MailboxExportRequest PowerShell command to export Exchange mailboxes to PST files.
Prerequisites to Use New-MailboxExportRequest Command
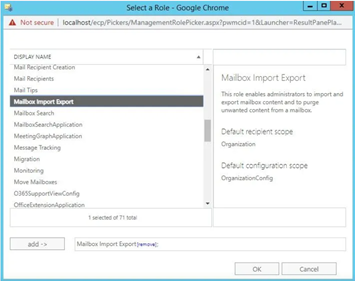
To use the New-MailboxExportRequest cmdlet, the user account that you will be using must be assigned with the Mailbox Import Export role. This role is not assigned to any user (role group) by default. You can use the Exchange Admin Center (EAC) to assign the required roles and permissions. Follow the given steps:
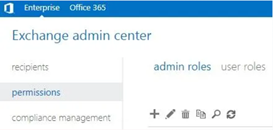
- Open the Exchange Admin Center (EAC). After login, click on Permissions and then admin roles.

- Click the Add (+) button.
- Enter the name for the group.
- Click the Add (+) button, under the Roles.
- Find Mailbox Import Export and double-click on it to add it to the list. Click OK.

- Add the user account to be used to export data in the Members area and click Save.
Alternatively, you can use the following PowerShell cmdlet in the Exchange Management Shell (EMS) to assign the Mailbox Import Export role.
You can also assign the newly created role to the user or group by using the below command.
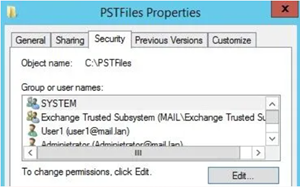
Now, you have to create a share folder where you want to export the PST files and give the right permissions (read and write) on it. After creating the folder, you need to share this folder with the users that have the Import/Export role. You also need to add the Exchange Trusted Sub System to the permissions. These users must have full permissions on the folder.

Using the New-MailboxExportRequest Cmdlet in Exchange Server
Let us see how to use the New-MailboxExportRequest cmdlet.
To export a single mailbox to PST, you can use the cmdlet as given below:
New-MailboxExportRequest -Mailbox
For instance,
In the above command, “Anubhuti” is the mailbox name and \\SERVER01\PSTFiles\Anubhuti.pst is the file path where the PST will be exported. Depending on the size of mailbox, it may take some time to finish.
You can also export multiple mailboxes at once. For this, you can run the cmdlet with a ForEach loop (see the below example):
This command will export all the mailboxes in your organization to PST files.
You can see the progress of the export by using the Get-MailboxExportRequest cmdlet. It will show the status of export as Completed, Failed, or In-Progress.
Moreover, you can use various parameters or switches with the New-MailboxExportRequest cmdlet to filter or export specific folders/items from the mailboxes. Here are some parameters or switches that you can use with this cmdlet.
- -IncludeFolders
To export specific folder(s) from the mailbox, you can use the IncludeFolders switch with the cmdlet (see the below example).
For instance,
- -ExcludeFolders
To exclude some particular folders while exporting the mailbox, you can use the ExcludeFolders switch (see the below command).
For instance,
- -ContentFilter
By using the ContentFilter parameter, you can export mailbox items to PST based on a specific date or a date range.
To export items till a particular date, you can use the command as given below:
The above command will export all the mailbox items till 1st January 2018.
To export items from a date onwards, you can use the gt switch with the cmdlet (see the below example).
To export mailbox data for a date range, you can combine the gt and lt switches (see the below example).
New-MailboxExportRequest -ContentFilter {(Received -lt '01/01/2020')-and (Received -gt '01/01/2019')} -Mailbox User1 -Filepath \\EX01\PSTFiles\User1range.pstCopy Code
To Conclude
Above, we have explained how to use the New-MailboxExportRequest cmdlet to export mailboxes to PST in Exchange Server. However, it has some limitations, such as mailbox database must be online/mounted, export must be done one-by-one, running script to export all the mailboxes hinders the server performance, and no option to see the export progress.
To overcome such limitations, you can use Stellar Converter for EDB - an ideal tool to export mailboxes from Exchange database (EDB) file to PST format. It can open any type of EDB file (online/offline) and from any version of Exchange Server - from Exchange 2007 till Exchange 2019. It can export user mailboxes, archives, public folders, and other EDB file items. It can also directly export the mailboxes and other data to a live Exchange Server or Microsoft 365 tenant. The tool also shows real-time progress of the export.
Yes, you can export multiple mailboxes to PST at once. However, running multiple exports at once might hinder the performance of the server and affect the experience of the users.
You can use the Get-MailboxExportRequest command. It will display the export status as completed, failed, or in-progress.
The Get-MailboxExportRequest will show the information if an export request fails. An export request may fail due to problems with permissions on the share/Exchange Server or destination storage issues.
You can use the Remove-ExportRequest command to remove the export requests, depending on the status or by specifying the name of the export.
Yes, it’s the only available destination type. Ensure that the Exchange Trusted Subsystem must have full permissions on the folder and share.
When using the New-MailboxImportRequest command, you can consider the following:
- The destination of the export will not be on the same server where the Exchange Server is.
- Ensure there is enough disk space.


 4 min read


